How to Build an OAuth Service using Python, Flask, Postgres and JWT
In this article we're going to learn how to build an OAuth service that can be used as a way to authenticate calls to an API or within a microservices architecture. In this project we will be using Python, Flask, Postgres and JWT
Objectives
- Learn about OAuth using Client Credentials and JSON Web Token or JWT
- Learn how to set up a simple Oauth Service that uses Flask and JWT
Introduction
In this article we're going to learn how to build an OAuth service that can be used as a way to authenticate calls to an API or within a microservices architecture. In this project we will be using Python, Flask, Postgres and JWT.
JWT, or JSON Web Tokens provides a method of securely signing the response to an authentication request, providing a payload for transferring some identifying information. In addition, the token can be easily verified.

Refactoring Your Career: Redesigning Work, Health and Freedom in Tech
Burned out in tech? Build optionality without quitting. Evidence-based frameworks for sustainable careers. For mid-career engineers. No BS, no hustle.
Learn MoreThis process has two general steps. First a POST request is made to the API passing the clientid and clientsecret within it's content. We use POST instead of GET and pass the body in the content body so that it will be encrypted with SSL. Second, a service receiving a request for resources from another service would call "auth" to verify its token.
Authentication Workflow
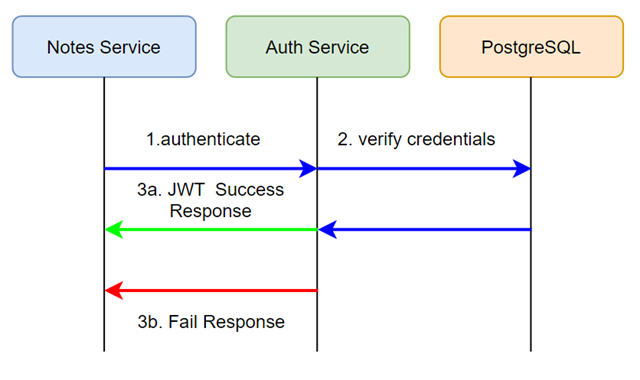
In the below diagram you can see the "notes" service calling the "auth" service with a request to authenticate. In the payload are passed the client id and client secret.
Verification Workflow
Next, when the notes service would like to verify whether the user is allowed to access the resource, they call the auth service's verify route in order to check the token. The auth service will response with either a valid payload, or a failed response.

So now that we've covered the basic concept, let's get into setting up the project!
Project Setup
This article assumes that you already have installed Python, Flask and PostgreSQL. You may have to make minor changes depending on how you set up PostgreSQL.
SSL
You will want to run this using SSL in production, since it's going to transmit sensitive authentication information over the Internet. You should set up your SSL to run with your production server, whether you are using NGINX or Apache.
Cloning the git repo.
The code for this project is located on github at the following URL flask-auth-service
In order to clone it into your project, you can simply type the following command from the folder where you would like to install the project.
git clone https://github.com/grizzlypeaksoftware/flask-auth-service
Postgres DB Setup
In this project we will be using a Postgres Database. Below is the SQL for creating the database in your system. You will need to create a user account for this database as well.
CREATE DATABASE authdb_dev
    WITH
    OWNER = postgres
    ENCODING = 'UTF8'
    LC_COLLATE = 'English_United States.1252'
    LC_CTYPE = 'English_United States.1252'
    TABLESPACE = pg_default
    CONNECTION LIMIT = -1;
Next we will set up the clients table that will contain the client id's and secrets, as well as their admin status. Notice that we will create a constraint that requires for CLientId to be unique, to prevent name collision.
CREATE TABLE public.clients
(
    "Id" integer NOT NULL GENERATED ALWAYS AS IDENTITY ( INCREMENT 1 START 1 MINVALUE 1 MAXVALUE 2147483647 CACHE 1 ),
    "ClientId" character varying(128) COLLATE pg_catalog."default" NOT NULL,
    "ClientSecret" character varying(256) COLLATE pg_catalog."default" NOT NULL,
    "IsAdmin" boolean NOT NULL,
    CONSTRAINT clients_pkey PRIMARY KEY ("Id"),
    CONSTRAINT "ClientId" UNIQUE ("ClientId")
)
We will also be creating a blacklist table for bad tokens or tokens that need to be logged out.
CREATE TABLE public.blacklist
(
    token character varying(256) COLLATE pg_catalog."default" NOT NULL
)
Once you have your database created, we will get started with the application.
The Application
Flask is a micro framework for python that makes it possible to create websites and APIs very rapidly. We're going to use flask as our authentication API's RESTful interface. The entry point to the application is named auth.py and this will serve as the flask web service.
To install flask and associated dependencies.
Here is the command-line method to install the dependencies for this project. We're going to use flask, psycopg2 for postgres, pyjwt for the JWT, and python-dotenv to handle environment variables.
pip install flask psycopg2 pyjwt python-dotenv
At the top of the code for auth.py you will see the imports that we're going to make for this project. In this script we are going to pull in flask, json and hashlib. Also we will import our authentication model which will provide the rest of the functionality.
from flask import Flask, request
import json
import hashlib

import authModel
authModel imports
Within authModel, we also pull in the following imports.
import os
import json

# pip install psycopg2
import psycopg2

#pip install -U python-dotenv
from dotenv import load_dotenv
load_dotenv()

# pip install pyjwt
import jwt

from authPayload import authPayload
from authResponse import authResponse
Using python-dotenv for easy environment variable management
AS you saw above, one of our imports is python-dotenv. This creates a way to pull in environment variables at runtime using a .env file found in the project folder. This allows dor easy management of our variables. If you run this app in a container, you could set up your docker run command to include the necessary env vars for your environment, as long as the following variables are set.
I created sample.env as a template. To run this, set the variables to the appropriate values for your database server and choose a phrase for your authentication hash secret and then change the name of the file to .env, or just set these variables in your environment. Linux is case-sensitive, remember!
DBNAME=[database name]
DBUSER=[user name for your database]
DBPASSWORD=[user's database password]
AUTHSECRET=[secret for the JWT]
EXPIRESSECONDS=3000
At this point, if you have everything set up and you ran the application, it should run on port 5000. Remember to turn off debug mode in production!
In order to run this from the command line just type…
python auth.py
python auth.py
 * Serving Flask app "auth" (lazy loading)
 * Environment: production
   WARNING: This is a development server. Do not use it in a production deployment.
   Use a production WSGI server instead.
 * Debug mode: on
 * Restarting with stat
 * Debugger is active!
 * Debugger PIN: 146-068-908
 * Running on http://127.0.0.1:5000/ (Press CTRL+C to quit)
Creating a client id and client secret
At this point it would be a good idea to create a client and secret to store in the database, but we're going to hash the secret to protect the data in the microservices. So we cannot just put the secret into the database directly without first determining the string value of the hashed version of the client secret.
This means that we should set up the hashing algorithm to create a clientid and clientsecret for us for first time use. The first route we will create then will need to be to register a client_id and secret so that we can set up the API for the first authentication.
In auth.py you will find a route for /client, which will provide a way to create or delete a client record.
@app.route("/client", methods=["POST","DELETE"])
def client():
    if request.method == 'POST':

        # verify the token
        # TO do after we create first credentials

        # get the client_id and secret from the client application
        client_id = request.form.get("client_id")
        client_secret_input = request.form.get("client_secret")
        is_admin = request.form.get("is_admin")

        # the client secret in the database is "hashed" with a one-way hash
        hash_object = hashlib.sha1(bytes(client_secret_input, 'utf-8'))
        hashed_client_secret = hash_object.hexdigest()

        # make a call to the model to authenticate
        createResponse = authModel.create(client_id, hashed_client_secret, is_admin)
        return {'success': createResponse}

    elif request.method == 'DELETE':
        # not yet implemented
        return {'success': False}
    else:
        return {'success': False}
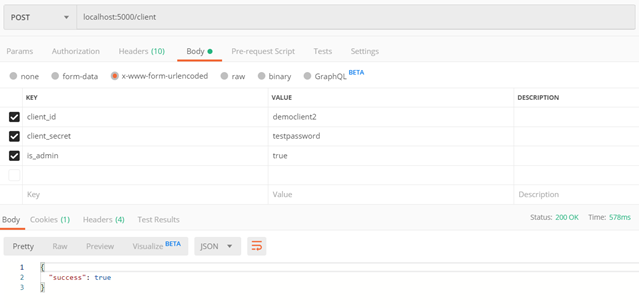
This route will be called via HTTP with a "POST" call to http://localhost:5000/client. When you call this API route, you will pass url-encorded form values for the clientid and clientsecret as well as a boolean value for is_admin.
Next, we will use SHA1 to hash the client_secret before storing it in the database. This will ensure that if anyone were to steal the authentication data, they could not see or decrypt the secrets.
After that we call the authModel to create a new client in the database and respond back with status, and then return the status back to the calling API client. Let's take a look at the authModel.create function.
def create(clientId, clientSecret, isAdmin):

    conn = None
    query = "insert into clients (\"ClientId\", \"ClientSecret\", \"IsAdmin\") values(%s,%s,%s)"

    try:
        conn = psycopg2.connect("dbname=" + DBNAME + " user=" + DBUSER +" password=" +DBPASSWORD)
        cur = conn.cursor()
        cur.execute(query, (clientId ,clientSecret,isAdmin))
        conn.commit()
        return True
    except (Exception, psycopg2.DatabaseError) as error:
        print(error)
        if conn is not None:
            cur.close()
            conn.close()

        return False
    finally:
        if conn is not None:
            cur.close()
            conn.close()
In the above function we simply insert the client id, client secret and isAdmin value into the database. The secret will have been hashed with a SHA1 hash before getting to this point. isAdmin will either make the credential an admin to the authentication API or not.
You can see where I made a call to this API endpoint using Postman.
So now that we have an admin client we should secure it to ensure only an admin user can perform this function. However I want to go into authentication now before we cover verifying the tokens. So let's move on to the /auth route.
Authentication
Now that we have created a way to insert a client's credentials into the database, we can move on to creating an authentication method. In order to do this, we will create a new route in the microservice to make a POST call to /auth. The URL in Postman will look like http://localhost:5000/auth.
Let's take a look at the code.
# API Route for checking the client_id and client_secret
@app.route("/auth", methods=["POST"])
def auth():
    # get the client_id and secret from the client application
    client_id = request.form.get("client_id")
    client_secret_input = request.form.get("client_secret")

    # the client secret in the database is "hashed" with a one-way hash
    hash_object = hashlib.sha1(bytes(client_secret_input, 'utf-8'))
    hashed_client_secret = hash_object.hexdigest()

    # make a call to the model to authenticate
    authentication = authModel.authenticate(client_id, hashed_client_secret)
    if authentication == False:
        return {'success': False}
    else:
        return json.dumps(authentication)
Here, we create a route called /auth that accepts a POST request. The request will accept two parameters that will come from the form POST, clientid, and clientsecret. The client id and client secret are very much like a username and password. You will need to secure the client_secret in your applications.
Next, the program will hash the clientsecret using a SHA1 hash. Note that you can change this to use a more difficult hash algorithm, such as SHA256, if you choose. This hashed value will be passed to the database in a query to determine if the clientid and client_secret match.
If the authentication fails, a failure response is passed back to the calling application. If the authentication is successful, a JWT token response will be provided. Let's take a look at the data model.
def authenticate(clientId, clientSecret):

    conn = None
    query = "select * from clients where \"ClientId\"='" + clientId + "' and \"ClientSecret\"='" + clientSecret + "'"
    try:
        conn = psycopg2.connect("dbname=" + DBNAME + " user=" + DBUSER +" password=" +DBPASSWORD)
        cur = conn.cursor()
        cur.execute(query)
        rows = cur.fetchall()
        isAdmin = False

        if cur.rowcount == 1:
            for row in rows:
                isAdmin = row[3]
                payload = authPayload(row[0],row[1], isAdmin)
                break

            encoded_jwt = jwt.encode(payload.__dict__, AUTHSECRET, algorithm='HS256')
            response = authResponse(encoded_jwt,EXPIRESSECONDS, isAdmin)

            return response.__dict__
        else:
            return False

    except (Exception, psycopg2.DatabaseError) as error:

        print(error)
        if conn is not None:
            cur.close()
            conn.close()

        return False
    finally:
        if conn is not None:
            cur.close()
            conn.close()
This is where we make the call to the database backend. This could be implemented in various ways, such as using a stored procedure, but in this case I just used a classic select query.
If there is a row found in the database with a clientid and clientsecret that match the query, the request is authenticated and we proceed to create the JWT. JSON Web Tokens are signed with a secret key, so they cannot be altered by anyone who does not have the secret. This is how the system is able to trust that the JWT's are secure.
JWT authorizations are accomplished by passing data in the payload of the token. For this example, I created a data structure called authPayload.
class authPayload(dict):

    def __init__(self, id, clientId, isAdmin):

        EXPIRESSECONDS = int(os.getenv('EXPIRESSECONDS'))

        # set the id of the object from Postgres
        self.id = id

        #  The client id (like the user id)
        self.sub = clientId

        self.isAdmin = isAdmin

        # set the expiry attrbute
        self.exp = datetime.utcnow() + timedelta(seconds=EXPIRESSECONDS)
This class makes up the definition of the data that we will send in the JWT payload. The sub value will contain the clientId for reference. We will also add an isAdmin value to indicate whether the calling API has admin rights. note: You could expand on this by providing read, write, update, delete true or false settings Also, the expiration time for the token is passed in the payload so that the client can verify when they need to re-authenticate.
In this case, we're returning the expiration and isAdmin values in the
At this point, you should be able to authenticate using this service using Postman, and receive a token in response.

At this point, the client api has been authenticated. Whenever you need to check to see if a client has access to a resource, the payload found in the token can be used to determine the level of access.
Let's move on and create a route to /verify JWT tokens.
Verification
Going back to our original example, the notes service will next need to verify that the request for a resource is allowed. This is done by verifying the signed JWT token.
In order to do this we will need to create a /verify route. This code will accept the token that was returned in the /auth response and verify it, returning the payload or a failure response.
# API route for verifying the token passed by API calls
@app.route("/verify", methods=["POST"])
def verify():
    # verify the token
    authorizationHeader = request.headers.get('authorization')
    token = authorizationHeader.replace("Bearer ","")
    verification = authModel.verify(token)
    return verification
The above code obtains the authorization header on the /verify route and grabs the token from the string that is returned. Then the token is passed to the authModel verify method to be verified.
In the following code, we will take a look at how the token is verified using JWT.
def verify(token):
    try:
        decoded = jwt.decode(token, AUTHSECRET, algorithms=['HS256'])
        return decoded
    except (Exception) as error:
        print(error)
        return {"success": False}
This function uses a try/except block to decode the token that was passed to the API. The variable AUTHSECRET points to an environment variable that contains the secret signing key for the JWT. If the decode method throws an exception due to the token being invalid then the API will return a failure response.
An important part of the verify route in this type of authentication is to use JWT to communicate authorizations to the calling API client application. In our application we're passing the isAdmin value from the database back in the JWT payload. This can be used by the client API in order to provide admin rights to the signed in user. Since the payload is JSON, the format is flexible and you can use it as needed for your authorizations, depending on the needs of your APIs.
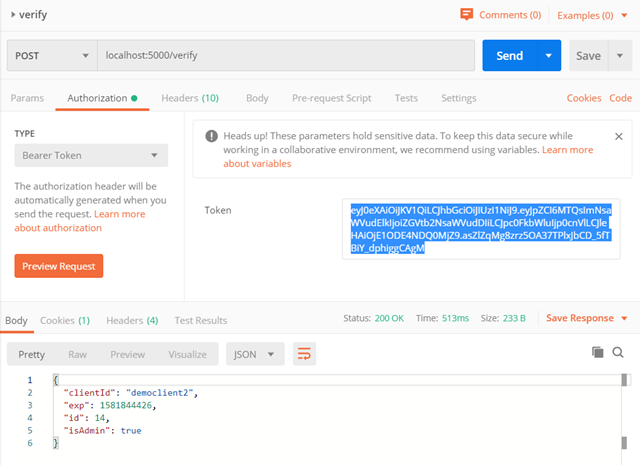
Using Postman, we can now use the token received in the previous authentication in order to verify it as in the preceding example. The token is placed on the authorization header using the bearer token type of header. The url for this request would be http://localhost:5000/verify.
In return you can see the JWT payload, which contains the clientId, the expiration timestamp (Unix), the sql data row Id, and the isAdmin value. The calling service is now able to confirm that the token is valid and can grant access to the resource.
Logging out a token.
At this point, the service has enough functionality to be used for authentication of your microservices. However, what about when you need to disable a token that is currently active? For example if there is a user who has clicked on a logout button, then the current token should be disabled. In addition, having a logout route for tokens makes it possible to disable a token being used by an attacker.
In order to do this, we will use the table that we created earlier called blacklist. When a user passes a token to the /logout route, the application will insert the token into the blacklist table.
We will then update the /verify route to check the blacklist table before returning the token response, to make sure that the token has not been logged out.
Here is the code for the /logout api route.
@app.route("/logout", methods=["POST"])
def logout():
    token = request.form.get("token")
    status = authModel.blacklist(token)
    return {'success': status}
As you can see in the preceding code, the route just does the job of getting the token from the form post and passing it to the authModel blacklist method, which is displayed as follows.
def blacklist(token):
    conn = None
    query = "insert into blacklist (\"token\") values(\'" + token +"\')"
    try:
        conn = psycopg2.connect("dbname=" + DBNAME + " user=" + DBUSER +" password=" +DBPASSWORD)
        cur = conn.cursor()
        cur.execute(query)
        conn.commit()
        return True
    except (Exception, psycopg2.DatabaseError) as error:
        print(error)
        if conn is not None:
            cur.close()
            conn.close()

        return False
    finally:
        if conn is not None:
            cur.close()
            conn.close()
The blacklist method simply inserts a token into the blacklist table and returns a success or fail response.
So now the blacklist has been created, but in order for logouts to truly work, the /verify route will also need to check the blacklist table before providing the verification.
We will create a method called checkBlacklist, and then call it from the verify method. Below you can see how we altered the verify method to account for the result from checkBlacklist.
def verify(token):
    try:
        isBlacklisted = checkBlacklist(token)
        if isBlacklisted == True:
             return {"success": False}
        else:
            decoded = jwt.decode(token, AUTHSECRET, algorithms=['HS256'])
            return decoded
    except (Exception) as error:
        print(error)
        return {"success": False}
Next we will need to create the action checkBlacklist function in the authModel. The function simply takes a token value and returns true or false if the token is found. On exception, it returns True.
def checkBlacklist(token):
    conn = None
    query = "select count(*) from blacklist where token=\'" + token + "\'"
    print(query)
    try:
        conn = psycopg2.connect("dbname=" + DBNAME + " user=" + DBUSER +" password=" +DBPASSWORD)
        cur = conn.cursor()
        cur.execute(query)
        result = cur.fetchone()
        if result[0] == 1:
            return True
        else:
            return False
    except (Exception, psycopg2.DatabaseError) as error:
        print(error)
        if conn is not None:
            cur.close()
            conn.close()

        return True
    finally:
        if conn is not None:
            cur.close()
            conn.close()
At this point we now have everything in place in order to do the following.
- authenticate a request using a clientid and clientsecret, returning a JWT
- verify the token and obtain the authorization payload
- logout blacklisted tokens
Conclusion
In this article we're learned how to create an OAuth service that can be used as a way to authenticate API calls within a microservices architecture. We used Python, Flask, Postgres and JWT in order to accomplish this.
We learned about JWT, or JSON Web Tokens to provide a method of signing the authentication response to ensure that it is valid and to provide an authorizations payload to contain information about which resources the calling API will have access to.
I hope that you enjoyed reading this article and that it helped you learn or provide some other value in your python programming pursuits!
