How to create an ERC20 token contract for Ethereum
In this article are are going to write the code to create our own cryptocurrency token, leveraging the ERC-20 token smart contract for Ethereum. This is the fourth article in our serious about cryptocurrency and web3 development for Ethereum using Solidity.
In this article are are going to write the code to create our own cryptocurrency token, leveraging the ERC-20 token smart contract for Ethereum. This is the fourth article in our serious about cryptocurrency and web3 development for Ethereum using Solidity.
The source code for this article can be found on github in the following repository, Code Repo
The Fundamentals of Training an LLM: A Python & PyTorch Guide
Build a GPT-style transformer from scratch in Python. Learn how LLMs actually work through hands-on code. No ML experience required.
Learn MoreBefore we begin
This article assumes a certain degree of technical skill and some basic knowledge of the Ethereum blockchain. Before writing the code for this article, it might be worth reviewing some of our previous articles in the series.
Setting up your Crypto Development Environment
Deploying Smart Contracts with Truffle and Ganache
Creating an Ownable Smart Contract in Solidity for Ethereum
What is a token?
A token is a digital representation of a diverse variety of assets. Examples of this could be an in-game currency, a digital stock certificate, a deed, a trading card or any other digital representation of an asset. For example when you participate in a points or rewards program with a store that you shop with, the points are a digital representation of the value you get as the reward.
There are multiple types of tokens, such as currency tokens, asset tokens, collectible tokens like NFTs, resource tokens, access tokens, equity tokens, voting tokens and more.
What is ERC-20?
In the Ethereum comunity, standards have developed to ensure that tokens created by developers all work interoperably with the tools and features of the ecosystem. For example, in order for a crypto wallet to be able to work with the token, there must be a common interface that people use so that the tokens will work with them. As a result, ERC-20 has emerged as the de-facto standard for fungible Ethereum tokens. Fungible tokens are tokens in which each of them token that are in existence is of equal value as all of the others. Kind of like a penny, or a first class postal stamp.
The ERC-20 Token Standard
The ERC-20 Token standard was created in order to make sure that developers create their tokens in a manner that makes them able to interoperate with wallets, exchanges and other dApps (decentralized applications). The official standard documentation for ERC-20 can be found here. ERC-20 Token Standard.
In the ERC-20 standard, the following functions must be implemented.
function name() public view returns (string)
function symbol() public view returns (string)
function decimals() public view returns (uint8)
function totalSupply() public view returns (uint256)
function balanceOf(address _owner) public view returns (uint256 balance)
function transfer(address _to, uint256 _value) public returns (bool success)
function transferFrom(address _from, address _to, uint256 _value) public returns (bool success)
function approve(address _spender, uint256 _value) public returns (bool success)
function allowance(address _owner, address _spender) public view returns (uint256 remaining)
In addition to these functions, the following Events must also be implemented as a part of the ERC-20 standard.
event Transfer(address indexed _from, address indexed _to, uint256 _value)
event Approval(address indexed _owner, address indexed _spender, uint256 _value)
Writing the Code
The functions and events listed above outline the interface for how the token smart contract will be interfaced. But we will also need to set up the application scaffolding and set some variables for storing the token holder's addresses and balances.
We're going to make this smart contract "ownable", which is a concept that we learned in the previous article. Here is the link to that article. Creating an Ownable Smart Contract in Solidity for Ethereum
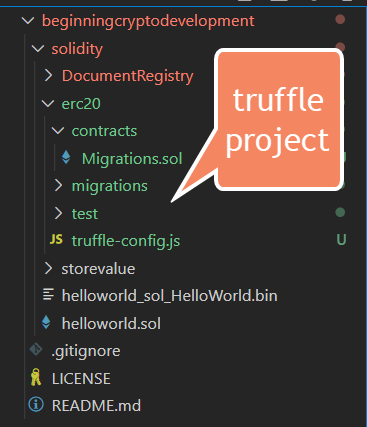
In the source code repo this particular folder is /solidity/erc20. But you can create a folder anywhere for your token, and then use truffle to initialize a project scaffolding for the token.
truffle init
Once you do this, you will get a folder structure that looks like this.
Bring the Ownable.sol file over for use in this project.
We're going to make this contract an ownable contract so that we can set access control on some of the functions as well as provide a way for the owner to transfer the smart contract to another wallet if so desired. So we're going to copy the Ownable.sol contract from the previous article as mentioned previously. With this we will be able to extend or inherit the properties of Ownable.sol in our ERC20 contract.
// SPDX-License-Identifier: MIT
// Ownable.sol

pragma solidity ^0.8.12;

// Ownable.sol = provides contract ownership functions
abstract contract Ownable {

    address private _owner;

    event OwnershipTransferred(address indexed previousOwner, address indexed newOwner);

    constructor() {
        _owner = msg.sender;
    }

    function owner() public view virtual returns (address) {
        return _owner;
    }

    function transferOwnership(address newOwner) public virtual onlyOwner{
        require(newOwner != address(0), "Ownable: new owner is the zero address");
        _transferOwnership(newOwner);
    }

    function _transferOwnership(address newOwner) internal virtual{
        address oldOwner = _owner;
        _owner = newOwner;
        emit OwnershipTransferred(oldOwner, newOwner);
    }

    modifier onlyOwner() {
        require(owner() == msg.sender, "Ownership Assertion: Caller is not the owner.");
        _;
    }
}
Now on to the next step of creating the token!
Creating PuppyCoin, our first ERC20 Smart Contract
Now that we have Ownable set up, we can create the file for the ERC-20 contract. We will call the file PuppyCoin.sol, and here is the basic smart contract ready for development, and extending the Ownable features.
pragma solidity ^0.8.12;

import "./Ownable.sol";

contract PuppyCoin is Ownable{
    // functions will go here
}
Setting up the variables for PuppyCoin
The ERC-20 standard calls for functions that retrieve the name of the token the symbol, the number of decimals to calculate, and the total supply of the token. Also, the token needs to have variables to store the balances for each address that has a token on the contract and the allowances for giving people the ability to withdraw on your behalf. The allowances will be explain in further detail when implementing the TransferFrom and Allowance functions. All of these variables are set to private in order to prevent people from directly manulating them.
contract PuppyCoin is Ownable{

    // a mapping (like a hash table) to store balances
    mapping(address => uint256) private _balances;

    // a mapping to store allowance information
    mapping(address => mapping(address => uint256)) private _allowances;

    // the name of the token
    string private _name = "Puppy Coin";

    // the symbol of the token
    string private _symbol = "$PUPPY";

    // the total supply of the token
    uint256 private _totalSupply = 0;

    // the number of decimals to use for token divisibility
    uint256 private _decimals = 18;
}
Basic Getter Functions
Next, we will implement the basic function calls so that callers to the contract can determine the value of the name, symbol, total supply and decimals values.
    function name() public view returns(string memory){
        return _name;
    }

    function symbol() public view returns (string memory){
        return _symbol;
    }

    function decimals() public view returns (uint256) {
        return _decimals;
    }

    function totalSupply() public view returns (uint256) {
        return _totalSupply;
    }
Getting Balances and Addresses
The next two functions are more getter functions that get the balanceOf an account address, and that get the amount of approved allowance that a token owner has granted to a spender's account.
What is this allowance for any way?
Allowance is a tool that allows the owner of tokens to grant another wallet the ability spend a certain amount of tokens on their behalf. This allows the "spender" of the allowance to spend a certain amount of tokens without the owner giving the spender access to the private key. This can be used so that dApps and other smart contracts can interact with the token, and enable those apps to handle some functions on behalf of the owner.
    // get the balance of tokens owned by an address
    function balanceOf(address account) public view returns (uint256) {
        return _balances[account];
    }

    // get the allowance that the owner of tokens has assigned to a specific spender
    function allowance(address owner, address spender) public view returns (uint256) {
        return _allowances[owner][spender];
    }
The Functions to Approve Allowance
This next function is the "approve"function that allows the owner of the token to assign an allowance to another wallet address. This is a function that will change the state of the smart contract's variables. As a result, the transaction has to be signed by the message sender and a gas fee will be incurred for this transaction.
    // approve allowance for spender to spend certain amount as proxy
    function approve(address spender, uint256 amount) public virtual returns (bool) {
        address owner = msg.sender;
        _approve(owner, spender, amount);
        return true;
    }

    // internal _approve utility function for reuse.
    // approves allowance for a spender to spend an approved amount
    function _approve(
        address owner,
        address spender,
        uint256 amount
    ) internal virtual {
        require(owner != address(0), "ERC20: approve from the zero address");
        require(spender != address(0), "ERC20: approve to the zero address");

        _allowances[owner][spender] = amount;

        // emit an Approval "event" which will store the event arguments that
        // are passed to the transaction logs
        emit Approval(owner, spender, amount);
    }

The _allowances mapping is essentially a dual hash table with the owner's address mapping to the spender's addresses and to the amount.  Since the transaction is signed due to altering  state on the chain, and since the owner's address is used, it is not possible to set allowance for another's wallet.

        _allowances[owner][spender] = amount;
There is a little more code that needs to be written for this step.
The Approval Event
In the previous block of code, the _approve function emits an "Approval" event when it is done. Our code has not yet implemented the approval event. We will place this code near the top of the contract. The event will accept the same values that are passed to it in the _approve function, the owner's address, the spender's address, and the amount of allowance that was set.
   // Approval event declaration
    event Approval(address indexed owner, address indexed spender, uint256 value);
This wraps up the allowance approval functions! Now lets move on to the Transfer functions that allow the token to be transferred to another wallet.
Implementing the functions to transfer tokens
In this section we will implement the functions that allow the owner of the ERC-20 token to transfer tokens to another wallet. This function will alter the state of the contract on the blockchain, and therefore there is a gas cost to execute the function, and the message will be sent to Ethereum in a securely signed manner to ensure the authenticity of the sender.
We will split the function up so that the transfer functionality can be called internally from other functions. Please refer to the code that follows.
    // ERC-20 function to transfer an amount of the token to an address
    function transfer(address to, uint256 amount) public returns (bool success){

        // owner must be set to the message sender.
        address owner = msg.sender;

        _transfer(owner, to, amount);
        return true;
    }

    // internal utillity function to facilitate the transfer.
    function _transfer(
        address from,
        address to,
        uint256 amount
    ) internal virtual {
        require(from != address(0), "ERC20: transfer from the zero address");
        require(to != address(0), "ERC20: transfer to the zero address");

        // find out if the message sender's balance is sufficient and require that they have at least that amount
        uint256 fromBalance = _balances[from];
        require(fromBalance >= amount, "ERC20: transfer amount exceeds balance");

        // subtract the amount from the sender's balance.
        unchecked {
            _balances[from] = fromBalance - amount;
        }

        // add the amount to the sender's balance
        _balances[to] += amount;

        // emit the transfer event to transaction logs
        emit Transfer(from, to, amount);
    }
In the _transfer function, the contract determines if there is enough of the token in their account for the transaction, and throws an error if not. Then the token is subtracted from the sender's balance and added to the recipient's balance. And finally once the transfer has completed, a Transfer event is emitted to the blockchain that will log the transfer details to the transaction logs. for traceability.
Let's implement then Event and place it near the one that was created for approvals of allowance.
The Transfer Event
In the previous block of code, the _transfer function emits an "Transfer" event when it is done. Our code has not yet implemented the transfer event. We will place this code near the top of the contract. The event will accept the same values that are passed to it in the _transfer function, the owner's address, the recipient's address, and the amount of transfer that was sent.
   // Transfer event declaration
    event Transfer(address indexed from, address indexed to, uint256 value)
This wraps up the transfer functions! Next we will implement the last function that will allow the ERC-20 contract to meet the specification, the fransferFrom function, for allowance spending.
Implementing the transferFrom function
The ERC-20 token standard allows for a token holder to set an "allowance". The allowance gives another wallet the right to spend a certain amount of the holder's tokens! This is used for automation, and other uses within smart contracts. Imagine a situation where a parent gives an allowance to their kids. The parent is allowing the child to use a certain amount of predetermined money for their own use.
The transferFrom function allows an application to call the contract in order to spend some of the allowance that has been granted. This is the code that we will implement next. First the transferFrom function is created that adheres to the ERC20 standard, and then that function calls two internal functions, to spend the allowance, if allowed, and to execute the actual transfer.
    // function to allow a spender to spend their allowance
    // lets them transfer funds if they have an allowance from the owner of the funds
    function transferFrom(
        address from,
        address to,
        uint256 amount
    ) public returns (bool) {
        address spender = msg.sender;
        _spendAllowance(from, spender, amount);
        _transfer(from, to, amount);
        return true;
    }

    // function to check if owner has allowed transfer and then transfer, if allowed for that amount.
    // updates the allowance with the new amount.
    function _spendAllowance(
        address owner,
        address spender,
        uint256 amount
    ) internal virtual {
        uint256 currentAllowance = allowance(owner, spender);
        if (currentAllowance != type(uint256).max) {
            require(currentAllowance >= amount, "ERC20: insufficient allowance");
            unchecked {
                _approve(owner, spender, currentAllowance - amount);
            }
        }
    }
In the preceding code sample, the _spendAllowance function checks the allowance of the calling account, and determines if the allowance is enough to warrant the amount of the transaction. If everything checks out, the amount of the transaction is subtracted from the allowance and the transfer of tokens is allowed.
At this point, the smart contract fully meets the requirements of the ERC-20 Token Standard. Congratulations for making it to this point! Before we finish the project we're going to add a few additional functions for the contract owner. This will allow the owner of the token contract to mint tokens and for holders to burn tokens from their supply. This type of ERC-20 token is called a mintable, burnable token.
Making the Token Mintable
At this point, the ERC-20 contract is complete, but the total supply of the token is set to 0, and no wallets own any of the tokens. We're going to create a "mint" function that only the contract owner can execute. The mint function simply allows the contract owner to create new tokens from thin air and send them to any address they would like to.
The logic of this function is fairly simple. First, the totalSupply variable is incremented by the new amount of minted tokens and the account receiving the tokens is incremented with the amount as well.
    // Contract Owner Function to allow for the minting of tokens
    function mint(address to, uint256 amount) public onlyOwner virtual {
        _mint(to, amount);
    }

    // internal function to handle minting tokens into an account
    function _mint(address account, uint256 amount) internal {
        require(account != address(0), "ERC20: mint to the zero address");

        // increase the total supply of the token
        _totalSupply += amount;

        // update the balance of the account address with the minted tokens
        _balances[account] += amount;
        emit Transfer(address(0), account, amount);
    }
In the preceding code, we learned how to create a basic mint function for an ERC-20 contract. This would get the token to the point where you can use it, and even deploy it to the Ethereum network. But first we're going to implement one final set of functions. Since we created the ability to mint tokens, we're going to also allow a token holder to burn their own tokens, and for an account with an allowance to burn the tokens that they are allowed to spend.
Making the Token Burnable
So far we have created a mintable ERC-20 token. But what is the supply of the token is so large that the community associated with the token would like to deflate the economy? Or perhaps there is a dApp that periodically burns some of the tokens based on some upstream smart contract logic, maybe as part of a gaming economy or some other use case.
So let's make the token burnable. This function is going to be accessible by anyone that holds the token, but they have to have tokens in their account to burn. In addition to a simple burn function, we will make a way that an account that has an allowance for a certain amount of tokens can burn the tokens that they have access to. That function will be called burnFrom.
    // function for an an account with an allowance to burn their allowed tokens
    function burnFrom(address account, uint256 amount) public {
        _spendAllowance(account, msg.sender, amount);
        _burn(account, amount);
    }

    // internal function to choreograph the burn function
    function _burn(address account, uint256 amount) internal {
        require(account != address(0), "ERC20: burn from the zero address");

        uint256 accountBalance = _balances[account];
        require(accountBalance >= amount, "ERC20: burn amount exceeds balance");
        unchecked {
            _balances[account] = accountBalance - amount;
        }
        _totalSupply -= amount;

        // emit a transfer event
        emit Transfer(account, address(0), amount);
    }
Once this code is in place, the burn functions are completed, and the entire token has been created as well! This means that the coding is done and we can proceed to try to deploy the smart contract to our local blockchain environment.
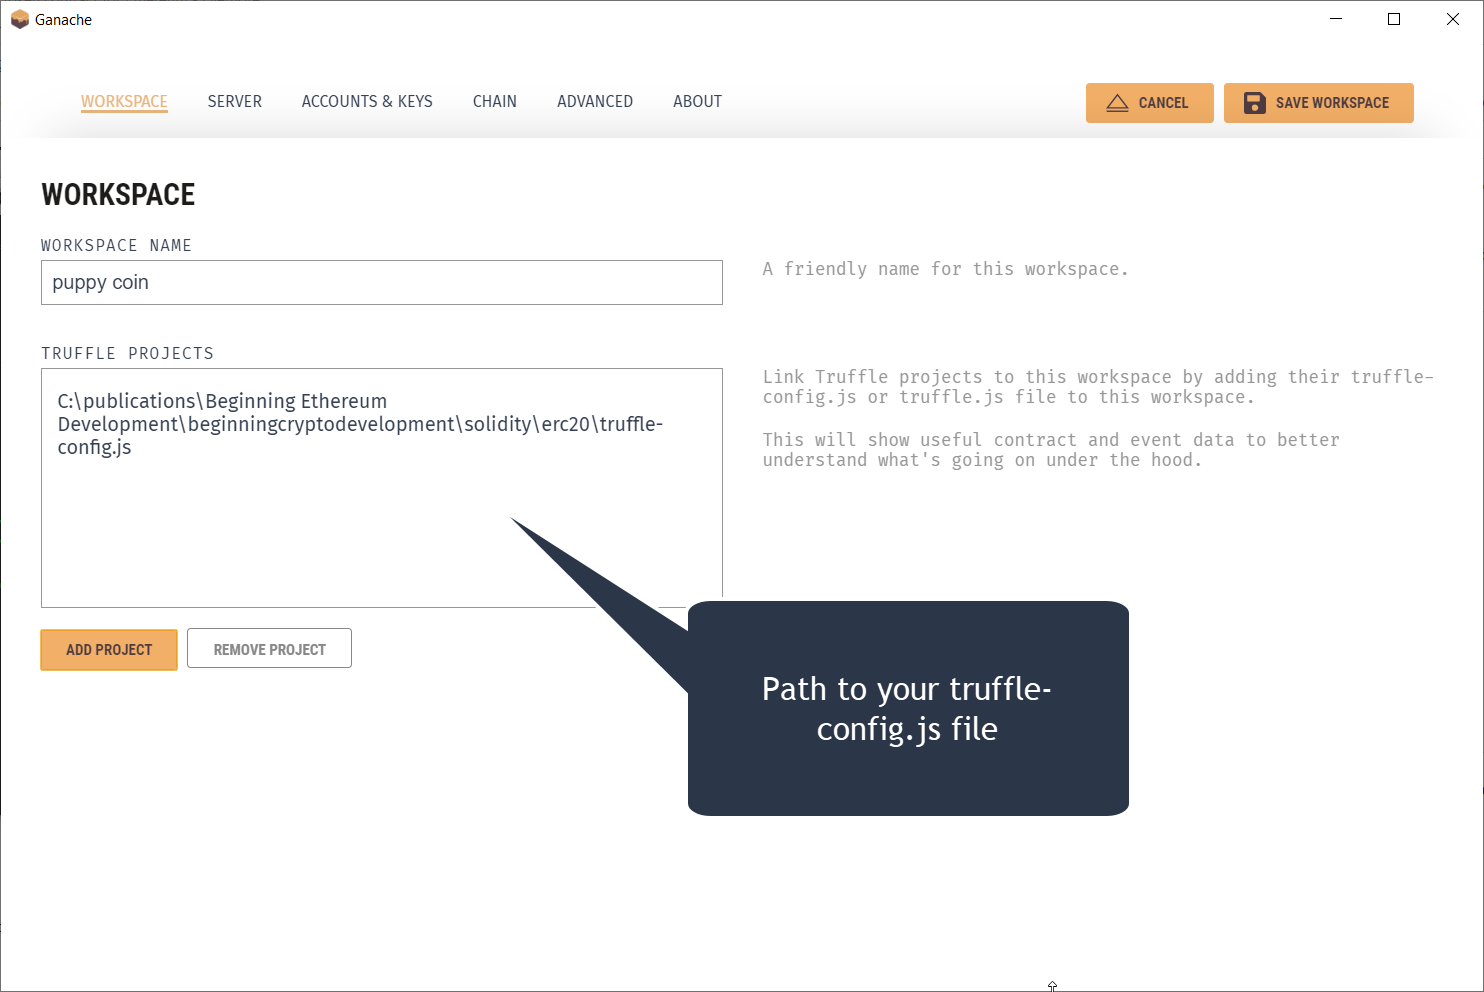
Deploying to Ganache
Now that all of the code is written, it's time to test it out! First we'll get an environment set up for the project in Ganache. We'll call it Puppy Coin and click to add the project, navigating to the file system location of your truffle project.
Once the instance is running we will be able to migrate the contract to the ganache instance. but first, we need to add the migration javascript. In the migrations folder, create a file called 2_PuppyCoin.js.
The file should contain the following.
const Migrations = artifacts.require("PuppyCoin");

module.exports = function (deployer) {
  deployer.deploy(Migrations);
};
And now we can go to the command line and run truffle.migrate from the location of the truffle project.
truffle migrate
Assuming no errors due to syntax occur you should see a migration transaction output that looks as follows.
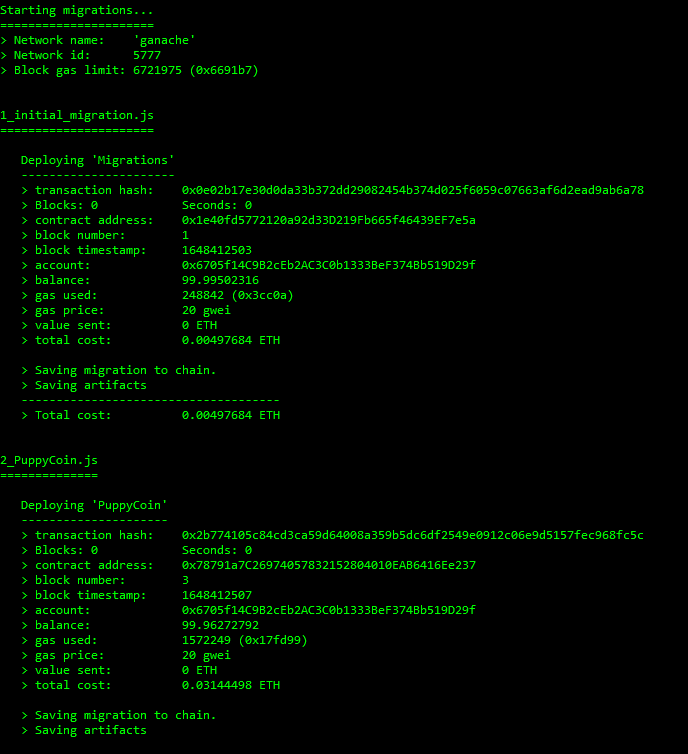
And like that, the contract has been migrated to your local blockchain and you can actually test out the functions! Let's get started!
Testing the ERC-20 functions in Truffle Console
Now that everything is in place we can test out all of the functions in the truffle console. Here is an excerpt of the function commands as made from the console.
# Create instance of contract
    let instance = await PuppyCoin.deployed()

# Get total supply
    var supply = await instance.totalSupply();
    console.log(web3.utils.fromWei(supply))

# Get name of token
    var name = await instance.name();
    console.log(name);

# Get Symbol of token
    var symbol = await instance.symbol();
    console.log(symbol);

# get decimals
    var decimals = await instance.decimals();
    console.log(decimals.words[0]);

# mint tokens
    var amt = web3.utils.toWei("100")
    var mintRes1 = await instance.mint("0x6705f14C9B2cEb2AC3C0b1333BeF374Bb519D29f", amt)

# get balance of tokens for an account
    var bal1 = await instance.balanceOf("0x6705f14C9B2cEb2AC3C0b1333BeF374Bb519D29f")
    console.log(web3.utils.fromWei(bal1))

# transfer tokens
    var trans1 = await instance.transfer("0x72444052B8B7E6bB07b78CfaC1ec2c88f18682f5","1000000000000000000")
    var bal2 = await instance.balanceOf("0x72444052B8B7E6bB07b78CfaC1ec2c88f18682f5")
    console.log(web3.utils.fromWei(bal2))

# approve allowance
    var allowance = await instance.approve("0x72444052B8B7E6bB07b78CfaC1ec2c88f18682f5", "10000000000000000")

# get allowance
    var allow1 = await instance.allowance("0x6705f14C9B2cEb2AC3C0b1333BeF374Bb519D29f","0x72444052B8B7E6bB07b78CfaC1ec2c88f18682f5")
    console.log(web3.utils.fromWei(allow1))

# transfer from owner's tokens with allowance
    var xferFrom = await instance.transferFrom("0x6705f14C9B2cEb2AC3C0b1333BeF374Bb519D29f","0x72444052B8B7E6bB07b78CfaC1ec2c88f18682f5", "1000000000000")

# burn tokens
    var burn = await instance.burn("100000000000000000000")
    var bal3 = await instance.balanceOf("0x6705f14C9B2cEb2AC3C0b1333BeF374Bb519D29f")
    console.log(web3.utils.fromWei(bal3))
Congratulations! You now have a working ERC-20 token. It's ready to be migrated to the test net or even mainnet!
Next Steps
In our next article, we're going to learn how to create another important smart contract, the non-fungible token, or NFT! We will use the standard for NFT Tokens, called ERC-721 in that article.
Until then, I hope you have enjoyed this article and learned something of value.
